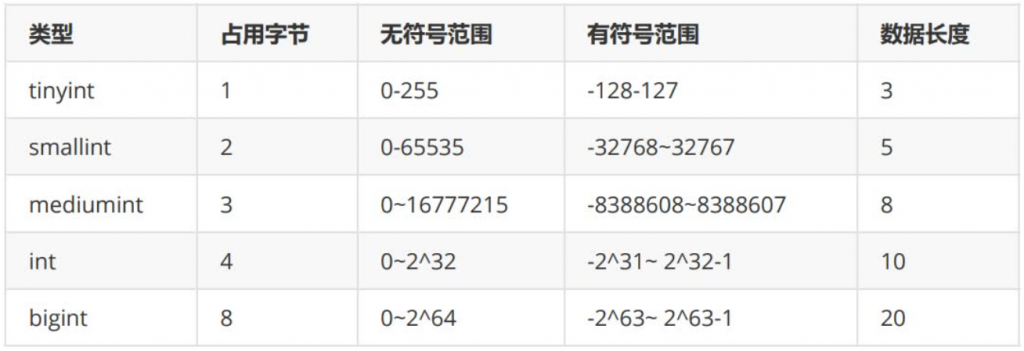
标准化数据库专用服务器
建议CPU:MEM 1:2+
低配需求:8C 32G+,500以内连接数,QPS 1-500,TPS 1-100
标准配置:16C 64G+,1000以内连接数,QPS 500-1000,TPS 100-200
高配:64C 256G
标准化操作系统及硬件参数
1.关闭NUMA
a.bios级别:
在bios层面numa关闭时,无论os层面的numa是否打开,都不会影响性能。
numactl - -hardware
available: 1 nodes (0) #如果是2或多个nodes 就说明numa没关掉
b.OS grub 级别:
vi /boot/grub2/grub.cfg 修改启动参数,加入numa=off

default=0
timeout=5
hiddenmenu
foreground=000000
background=ffffff
splashimage=(hd0,0)/boot/grub/oracle.xpm.gz
title Trying codo as HD0
root (hd0,0)
linux16 /vmlinuz-3.10.0-1160.el7.x86_64 root=UUID=e9600de5-090b-443d-bbac-88385029e9a8 ro rhgb quiet LANG=en_US.UTF-8 numa=off
initrd16 /initramfs-3.10.0-1160.el7.x86_64.img
在os层numa关闭时,打开bios层的numa会影响性能,QPS会下降15-30%;
c.数据库级别(8.0之前版本):
mysql> show variables like % numa%';
+++++++++
variable name
value
innodb numa interleave oFF
+
--+
或者:
vi / etc/ init. d/mysqld
找到如下行
Give extra arguments to mysgld with the my. cnf file. This script I
may be overwritten at next upgrade
sbindir/ mysgld safe - -datadir= " sdatadir" --pid-file= " Smysgld pid file path Sother args > / dev/ null
wait for pid created s! Smysgld pid file path" ; return value=$?将$bindir /mysqld safe --datadir ="Sdatadir "这一行修改为:
/ usr/ bin/ numactl - -interleave all sbindir/ mysgld safe - -datadir=sdatadir 4pid-file= Smysqld pid file path" Sother args > / dev/ null wait for pid created s! Smysgld pid file path" i return value=$?
2.开启CPU高性能模式
3.RAID配置
推荐使用RAID10
4.关闭THP(大页内存)
vi etc/rc.local
在文件末尾添加如下指令:
if test -f /sys/kernel/mm/transparent_hugepage/enabled;then
    echo never > /sys/kernel/mm/transparent_hugepage/enabled
fi
if test -f /sys/kernel/mm/transparent_hugepage/defrag;then
    echo never > /sys/kernel/mm/transparent_hugepage/defrag
fi
[ rootalocalhost ] chmod + x /etc/rc.d/rc.local
[ root @ master ] # cat /sys/kernel/mm/transparent_hugepage/enabled
always madvise [never]
[ root @ master ] cat /sys/kernel/mm/transparent_hugepage/defrag
always madvise [never]
5.网卡绑定
6.存储多路径
使用独立存储设备,需要单独配置多路径
7.系统层面参数优化
a.更改文件句柄和进程数
内核优化
vi /etc/sysctl.conf
vm.swappiness = 5
vm.dirty_ratio = 20
vm.dirty_background_ratio = 10
net.ipv4.tcp_max_syn_backlog = 819200
net.core.netdev_max_backlog = 400000
net.core.somaxconn = 4096
net.ipv4.tcp_tw_reuse=l
net.ipv4.tcp_tw_recycle=0

vi /etc/security/limits.conf
root soft nofile 65535
root hard nofile 65535
* soft nofile 65535
* hard nofile 65535
b.防火墙
禁用Selinux/firewalld等安全控制组件
c.文件系统优化
推荐使用XFS文件系统
MySQI 数据分区独立,例如挂载点为:/data
mount 参数defaults ,noatime ,nodiratime ,nobarrier
d.不使用LVM
e.IO调度策略
SAS deadline
SSD& PCI-E: noop
centos 7默认是deadline
cat / sys/block/sda/queue/scheduler #临时修改为deadline (centos 6)
echo deadline > /sys/block/sda/queue/scheduler
vi/ boot/ grub2/ grub. cfg
更改到如下内容:
kernel /boot/vmlinuz-2.6.18-8.e15 ro root= LABEL= /elevator=deadline rhgb quiet
预装Mysql前硬件烤机压测
通过使用Stres、FIO等软件进行压力测试,得到硬件能承载的数据量
数据库软件标准化
版本
1、稳定版:选择开源的社区版的稳定版GA版本。
2、选择mysq1数据库GA版本发布后6个月-12个月的GA双数版本,大约在15-20个小版本左右。
3、要选择前后几个月没有大的BUG修复的版本,而不是大量修复BUG的集中版本。
4、要考虑开发人员开发程序使用的版本是否兼容你选的版本。
5、作为内部开发测试数据库环境,跑大概3-6个月的时间。
6、优先企业非核心业务采用新版本的数据库GA版本软件。
7、向DBA高手请教,或者在技术氛围好的群里和大家一起交流,使用真正的高手们用过的好用的GA版本产品。
最终建议:8.0.24+是一个不错的版本选择。向后可以选择双数版。
5.7.34+ | 8.0.24+
插件及工具
官方工具:
workbench
mysl-shell
第三方:
PXB
PT
binlog2sgl my2sgl myflash
FIO
sysbench
stress
jmeter
navicat/sqlyog
开始部署
创建用户
[root@localhost ~]# useradd mysql上传数据库安装包
使用终端工具或下载需要的数据库版本
[root@localhost ~]# ls /opt/mysql-8.0.24-linux-glibc2.12-x86_64.tar.xz
mysql-8.0.24-linux-glibc2.12-x86_64.tar.xz
[root@localhost opt]# tar xf mysql-8.0.24-linux-glibc2.12-x86_64.tar.xz
#将目录创建软连接到/usr/local/mysql
[root@localhost opt]# ln -s /opt/mysql-8.0.24-linux-glibc2.12-x86_64 /usr/local/mysql
#修改环境变量
[root@localhost opt]# echo "export PATH=/usr/local/mysql/bin:$PATH" >> /etc/profile
[root@localhost opt]# source /etc/profile
[root@localhost opt]# mysql -V
mysql  Ver 8.0.24 for Linux on x86_64 (MySQL Community Server - GPL)
#修改数据目录权限
[root@localhost opt]# mkdir -p /data/3306/data
[root@localhost opt]# chown -R mysql:mysql /data
#编辑数据库配置文件
[root@localhost opt]# mv /etc/my.cnf /etc/my.cnf.bak
[root@localhost opt]# cat>/etc/my.cnf<<EOF
> [mysqld]
> user=mysql
> basedir=/usr/local/mysql
> datadir=/data/3306/data
> socket=/tmp/mysql.sock
> [mysql]
> socket=/tmp/mysql.sock
> EOF
#初始化数据(低安全性,无密码,如无-insecure则初始化一个数据库root用户的临时密码)
[root@localhost opt]# mysqld --initialize-insecure
2023-06-27T20:39:47.822587Z 0 [System] [MY-013169] [Server] /opt/mysql-8.0.24-linux-glibc2.12-x86_64/bin/mysqld (mysqld 8.0.24) initializing of server in progress as process 107434
2023-06-27T20:39:47.848514Z 1 [System] [MY-013576] [InnoDB] InnoDB initialization has started.
2023-06-27T20:39:49.493692Z 1 [System] [MY-013577] [InnoDB] InnoDB initialization has ended.
2023-06-27T20:39:50.771299Z 6 [Warning] [MY-010453] [Server] root@localhost is created with an empty password ! Please consider switching off the --initialize-insecure option.
#启动数据库
[root@localhost opt]# cd /usr/local/mysql/support-files/
[root@localhost support-files]# ll
total 20
-rwxr-xr-x 1 7161 31415  1061 Mar 22  2021 mysqld_multi.server
-rw-r--r-- 1 7161 31415  2027 Mar 25  2021 mysql-log-rotate
-rwxr-xr-x 1 7161 31415 10576 Mar 25  2021 mysql.server
[root@localhost support-files]# cp mysql.server /etc/init.d/mysqld
[root@localhost support-files]# service mysqld start
Starting MySQL.Logging to '/data/3306/data/localhost.localdomain.err'.
. SUCCESS!
#设置root密码
[root@localhost support-files]# mysqladmin -uroot -p password
Enter password:
New password:
Confirm new password:
Warning: Since password will be sent to server in plain text, use ssl connection to ensure password safety.